All times are UTC - 5 hours [ DST ]


Post new topic Reply to topic  [ 48 posts ]  Go to page Previous  1, 2, 3
Author Message
 Post subject: Re: WD3200BMVV SATA conversion screw up
PostPosted: August 27th, 2016, 18:35 
Offline

Joined: August 21st, 2016, 18:36
Posts: 22
Location: united states
SUCCESS!!

Played with Reallymine a bit more and got some help from the devs.
Details here.

https://github.com/andlabs/reallymine/issues/5

Basically pointed reallymine to the 300GB image created with DDRescue and it decrypted the data in a few hours.
Data looks OK, but it's not my data so the owner will have to confirm if everything is there.

Start to finish, this was a fairly easy process.
It just took a long time to find the right steps.

If there's interest, I could make a tutorial of the process from start to finish

Thanks goes out to everyone who helped, especially fzabkar, drHDD, and Martin.
This was a great learning experience and everyone's advice and knowledge helped me inch closer to success.

Thanks again everybody


Top
 Profile  
 
 Post subject: Re: WD3200BMVV SATA conversion screw up
PostPosted: August 27th, 2016, 18:57 
Offline
User avatar

Joined: September 8th, 2009, 18:21
Posts: 15525
Location: Australia
A tutorial would be great. Thanks in advance.

_________________
A backup a day keeps DR away.


Top
 Profile  
 
 Post subject: Re: WD3200BMVV SATA conversion screw up
PostPosted: August 29th, 2016, 22:03 
Offline

Joined: August 21st, 2016, 18:36
Posts: 22
Location: united states
****Disclaimer****
This was done on a HD that had no other issues than a broken USB interface.
If your HD is a different model or the USB portion of the PCB can be fixed, this method may not apply.


SATA Conversion

Remove the PCB from the HD.

Decided to use a cut up SATA data cable and use the SATA connector off a dead HD for power.
Looking back it would have been easier to just wire the power straight to a PC power supply.

Attachment:
sata-pinout.png
sata-pinout.png [ 22.2 KiB | Viewed 8864 times ]


There are 2 groups of 4 pads on the PCB that can be used for power.
Any of the four will do.
We want the 5v positive line and ground (com).
Solder a wire from 1 of the 4 pads to pins 7,8, and 9 for positive and ground to 10,11,12.
Below is a pic from a different HD but the power pads are in the same location.
Attachment:
PowerPads.jpg
PowerPads.jpg [ 478.46 KiB | Viewed 8864 times ]

Attachment:
IMG_0596.JPG
IMG_0596.JPG [ 1.69 MiB | Viewed 8864 times ]


Next the data lines.

Strip the cut SATA data cable.
There are 4 insulated wires and 3 bare ground wires.

Attachment:
SataStripped.jpeg
SataStripped.jpeg [ 47 KiB | Viewed 8864 times ]


Twist all the ground wires together and solder them to the same ground pad where the SATA power connector is.
Used some kapton tape to keep the ground wires from touching anything else on the PCB.
Doesn’t have to be kapton tape just what I had on hand.

Use a multimeter to determine which data wires go to which pins on the SATA connector.

Run the following lines to the vias for E71, E72, E73, and E74
You should be able to poke the stripped SATA wires through the PCB and bend them over on the other side to temporarily hold them in place.

E71 = A+ or pin 2
E72 = A- or pin 4
E73 = B- or pin 5
E74 = B+ or pin 6

Solder the wires to the vias. Less is more here. It won’t take more than second on each via with a hot soldering iron and small amount of solder to attach them into place.

Attachment:
IMG_0578.JPG
IMG_0578.JPG [ 2.11 MiB | Viewed 8864 times ]


Use a multimeter again to verify that the pins on the SATA connector has continuity to the via on the other side of the board.

Bend any excess wire away from any other trace or component on the PCB, then cut as short as possible.

Remove the capacitors.
Not much to say about this step since the capacitors that need to be removed were already missing when I got this drive. Shouldn’t take much effort. Add some flux or a glob of solder and remove C13,C18,C31,C33 with a soldering iron and some tweezers. Try not to loose them. These components are very small. Some kind of magnification will help here.

Attachment:
CapsandSatawire.jpg
CapsandSatawire.jpg [ 5.41 MiB | Viewed 8864 times ]


Double check your connections with a meter again in case something heated up and came loose.
With the caps removed you can use their leftover pads as points of continuity.

Re-attach the PCB to the HD.
Connect SATA data cable to the MOBO of your PC and power to your PCs power supply.

Fire up your PC and get into the BIOS and double check that your drive is detected.
If not, power down the PC, remove the PCB and double check all your connections with a multimeter again.

Here's my finished mod. It's ugly but it works.

Attachment:
IMG_0594.JPG
IMG_0594.JPG [ 2.54 MiB | Viewed 8864 times ]


Next is Software:


Top
 Profile  
 
 Post subject: Re: WD3200BMVV SATA conversion screw up
PostPosted: August 29th, 2016, 22:34 
Offline

Joined: August 21st, 2016, 18:36
Posts: 22
Location: united states
Using Ubuntu for this.
Not because it’s better, but because most people are familiar with Ubuntu.
Any Linux based OS should work as long as you get a 64bit version.
Downloaded the following iso and created a bootable DVD.

http://mirror.pnl.gov/releases/16.04.1/ ... -amd64.iso

Connected the SATA converted WD3200MBVV and a 2TB HD for data storage to my PC.
Fired up the PC and booted to to the Ubuntu DVD.

Open Disks and find info for for both HDs and mount 2TB HD.
Note that for my system the WD3200MBVV is /dev/sdc and the 2TB HD is /dev/sdb1

When my 2TB is mounted by clicking on the play button it location is /media/ubuntu/584D906C6D0674FF
Don't mount or try to mount the SATA converted HD.
Attachment:
DisksEncryptedHD.png
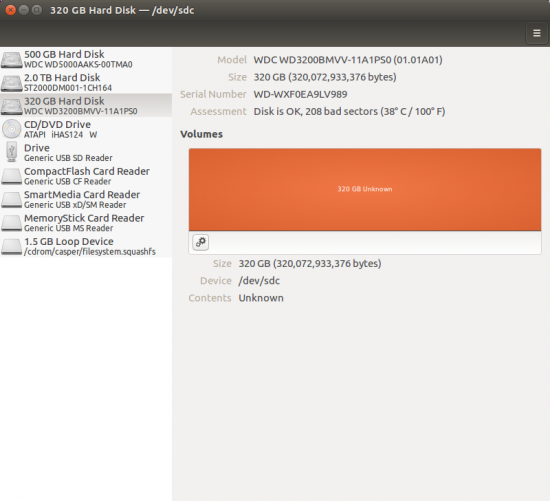
DisksEncryptedHD.png [ 103.55 KiB | Viewed 8862 times ]

Attachment:
MountDataDrive.png
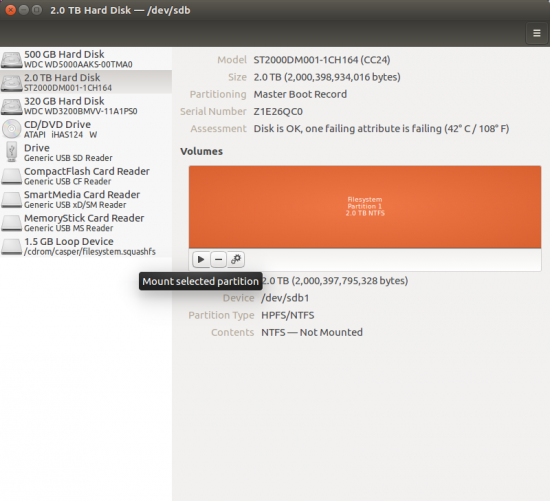
MountDataDrive.png [ 118.89 KiB | Viewed 8862 times ]

Attachment:
MountedHDLocation.png
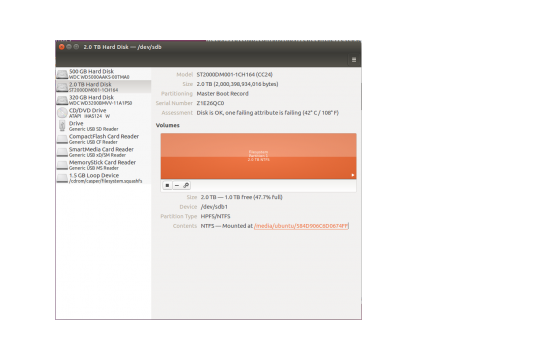
MountedHDLocation.png [ 162.37 KiB | Viewed 8862 times ]


Next we need Reallymine.
Open Firefox and download it here.

https://github.com/andlabs/reallymine/r ... inux-amd64

By default, Firefox saves the file to Downloads.
Open the file browser, right click reallymine-linux-amd64 and open the file properties.
Next under the permissions tab check the box to make reallymine executable.

Attachment:
SetExecuteReallyMine.png
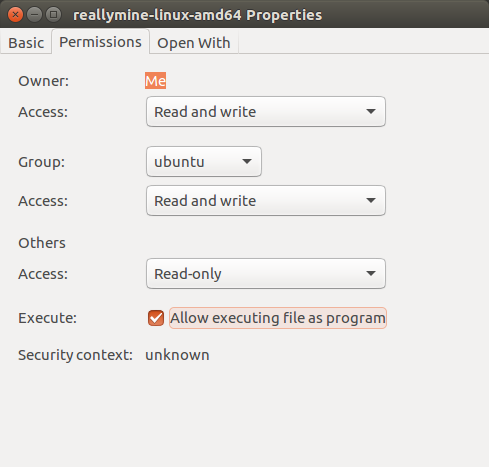
SetExecuteReallyMine.png [ 36.72 KiB | Viewed 8862 times ]


Now open the Terminal.
By default you are put into your Home directory.
Type ls to confirm this.
Type cd Downloads to change directory to Downloads (note upper and lower case matters)
Next type ls to confirm that reallymine-linux-amd64 is there.

Next you need to use the info from Disks to run reallymine.

Syntax to run reallymine
sudo ./reallymine-linux-amd64 /dev/”your-encrypted-HD” /media/ubuntu/”your-mounted-data-HD”/”folder-on-your-data-HD”/whaterver-you-want.img

My example:
sudo ./reallymine-linux-amd64 /dev/sdc /media/ubuntu/584D906C6D0674FF/decryptmyHD.img

Attachment:
reallymineexecute.png
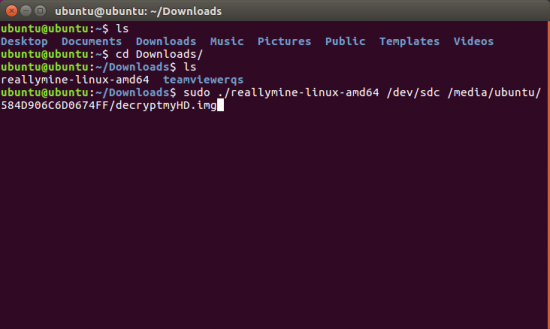
reallymineexecute.png [ 37.92 KiB | Viewed 8862 times ]


If it works reallymine will run and start decrypting the HD and save it to the image file you specified.

Attachment:
Decrypting.png
Decrypting.png [ 62.51 KiB | Viewed 8862 times ]


Now you have a decrypted image of you HD.
Create a new directory on your data drive to mount the image onto.

Syntax:
sudo mkdir /media/ubuntu/"your-data-HD"/"whatever-you-want-folder"

My example:
sudo mkdir /media/ubuntu/584D906C6D0674FF/DataCopy

Attachment:
DataCopyFolder.png
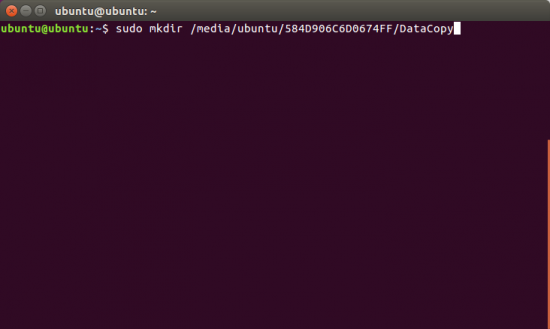
DataCopyFolder.png [ 13.91 KiB | Viewed 8862 times ]


Now you need to mount the image.
Before you can do that you’ll need some info from fdisk.

Go back to the terminal and point fdisk at your new decrypted image

Syntax for fdisk:
sudo fdisk -l /media/ubuntu/”path to you decrypted image file”

My example:
sudo fdisk -l /media/ubuntu/584D906C6D0674FF/decryptmyHD.img

Attachment:
fdisk.png
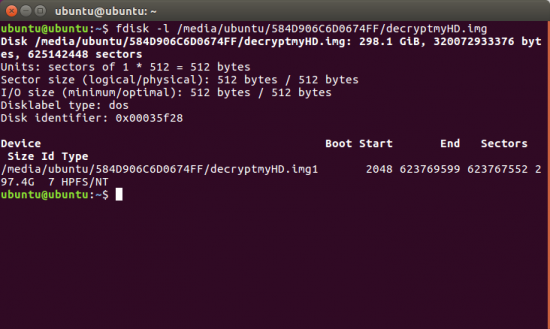
fdisk.png [ 57.17 KiB | Viewed 8862 times ]


Now you need to take the start # and multiply it with the sector size.

Attachment:
offset.png
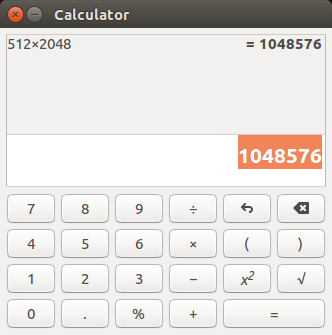
offset.png [ 20.17 KiB | Viewed 8862 times ]


Take that number back to the Terminal and mount the decrypted image.

Syntax for mount:
sudo mount -o loop,offset="your-offset" /media/ubuntu/"your-data-HD"/"decryptedHD".img /media/ubuntu/"your-data-HD"/"folder-you-just-created"

My Example:
sudo mount -o loop,offset=1048576 /media/ubuntu/584D906C6D0674FF/decryptmyHD.img /media/ubuntu/584D906C6D0674FF/DataCopy/

Attachment:
mountimage.png
mountimage.png [ 18.82 KiB | Viewed 8862 times ]


Now the image will open in the file explorer and you will see all your files.

You could now simply copy you files out to another folder or ext HD, but I did one more thing that is purely optional.


Top
 Profile  
 
 Post subject: Re: WD3200BMVV SATA conversion screw up
PostPosted: August 29th, 2016, 23:20 
Offline

Joined: August 21st, 2016, 18:36
Posts: 22
Location: united states
Beyond Compare
I use this app for large data copies when I want to be 100% sure everything copied.
You can compare 2 folders and have it copy from one side to the other.
During the copy BeyondCompare is checking that files in both folders are equal and will give you an error if something is not.

Too many times I've copied data in Windows, OSX, and Linux only to have the file browser crash or error out leaving me to start all over not knowing where it left off.

Open Firefox and grab the linux 64bit version here.

http://www.scootersoftware.com/bcompare ... _64.tar.gz
Note** They have a deb for Ubuntu but I never got it to install correctly.

Open the Terminal again and cd to the Downloads folder.
ls to confirm that the bcompare file is there.
Extract the installer.

sudo tar zxfv bcompare-4.1.8.21575.x86_64.tar.gz

Attachment:
extractBcompare.png
extractBcompare.png [ 37.12 KiB | Viewed 8859 times ]


cd into the new bcompare folder and run the installer.

ubuntu@ubuntu:~/Downloads/bcompare-4.1.8.21575$ sudo ./install.sh

Hit enter again at the install prefix? [/usr] prompt

The installer gives an error about a missing folder but it installs OK.


Attachment:
installBcompare.png
installBcompare.png [ 38.35 KiB | Viewed 8859 times ]


Run bcompare.

Attachment:
executeBcompare.png
executeBcompare.png [ 39.78 KiB | Viewed 8859 times ]


Now choose folder compare.

Attachment:
FolderCompare.png
FolderCompare.png [ 103.31 KiB | Viewed 8859 times ]


You can put /media/ubuntu in both left and right address fields to get started.
Find your data drive and right-click the DataCopy folder (mounted decrypted image) to set as the base folder on one side.
(Sorry about the pics quality, had to use my phone since I could not take screenshots while right clicking)

Attachment:
SetBaseFolderDecryptedMountedImage.JPG
SetBaseFolderDecryptedMountedImage.JPG [ 2.78 MiB | Viewed 8859 times ]


On the other side find you data drive, set as the base folder and right click again to create a new folder to copy the data out of the mounted image into.

Attachment:
BC-NewFolder.JPG
BC-NewFolder.JPG [ 4.11 MiB | Viewed 8859 times ]

Attachment:
NewFolderBCompare.png
NewFolderBCompare.png [ 15.38 KiB | Viewed 8859 times ]


Select all the files on one side, right click and choose copy to the right.

Attachment:
CopyToRight.JPG
CopyToRight.JPG [ 2.24 MiB | Viewed 8859 times ]

Attachment:
CopytoSide.png
CopytoSide.png [ 30.73 KiB | Viewed 8859 times ]


Click Start and Beyond Compare will now copy the folders and files to your new folder.

Attachment:
Copying.png
Copying.png [ 218.56 KiB | Viewed 8859 times ]


Then you can take that folder and copy/move it anywhere you want without needing to mount the image again.

And that's it.
Simple right?!?!?!
Honestly I think it took longer to write this tutorial than recover the actual data.
Hope this helps somebody down the line.

Thanks again to everyone who helped.


Top
 Profile  
 
 Post subject: Re: WD3200BMVV SATA conversion screw up
PostPosted: August 30th, 2016, 17:08 
Offline
User avatar

Joined: September 8th, 2009, 18:21
Posts: 15525
Location: Australia
Thanks very much for this great tutorial! It is much appreciated.

_________________
A backup a day keeps DR away.


Top
 Profile  
 
 Post subject: Re: WD3200BMVV SATA conversion screw up
PostPosted: November 21st, 2018, 13:17 
Offline
User avatar

Joined: April 24th, 2018, 11:02
Posts: 252
Location: Iran
this application can decrypt data for my passport ultra for jm20339 ?


Top
 Profile  
 
 Post subject: Re: WD3200BMVV SATA conversion screw up
PostPosted: March 2nd, 2020, 16:13 
Offline

Joined: March 2nd, 2020, 16:02
Posts: 1
Location: Los Angeles
I get to the point where Im asked for a pw (drive was not pw protected) :(

Any ideas? Help!


Attachments:
PW Help.jpg
PW Help.jpg [ 1.69 MiB | Viewed 5449 times ]
Top
 Profile  
 
Display posts from previous:  Sort by  
Post new topic Reply to topic  [ 48 posts ]  Go to page Previous  1, 2, 3

All times are UTC - 5 hours [ DST ]


Who is online

Users browsing this forum: Google [Bot], Google Adsense [Bot] and 33 guests


You cannot post new topics in this forum
You cannot reply to topics in this forum
You cannot edit your posts in this forum
You cannot delete your posts in this forum
You cannot post attachments in this forum

Search for:
Jump to:  
Powered by phpBB © 2000, 2002, 2005, 2007 phpBB Group